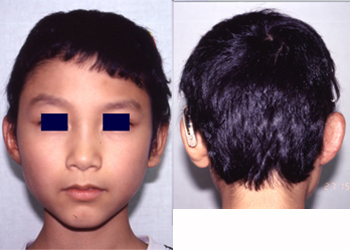
Preoperative appearance
Preoperative appearance
2nd stage post-operative appearance
2nd stage post-operative appearance

2nd stage post-operative appearance
Photos in this blog are shown for your reference for understanding the treatment of microtia. Please understand that surgery results vary depending on each case.
Possible complications following microtia reconstruction surgery
Transient facial palsy, Failure of skin graft due to vascular compromise, Infection resulting in exposure of the 3-D frame, Pneumothorax, Postoperative pneumonia, Suture failure, Alopecia, Decubitus and Others
In the event such complications arise, appropriate action is taken based on the case. Additional or secondary surgery may be required in some situations.
First stage operation-The fabrication of the 3 dimensional costal cartilage frame [3-D frame]
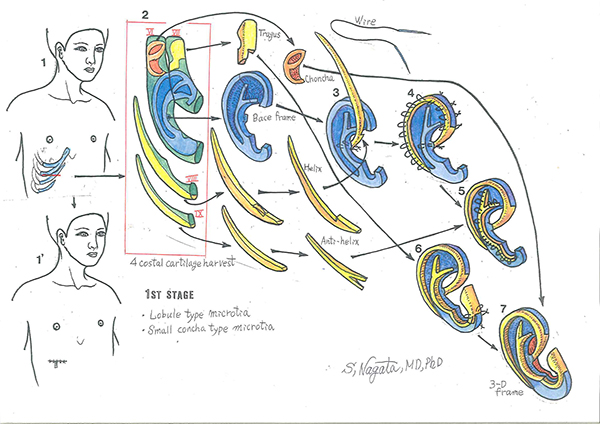
Diagram 1: The costal cartilages harvested for the fabrication of the 3-D frame are the sixth, seventh, eights, and the ninth costal cartilages. Diagram 2: Harvested 4 costal cartilages. The tragus unit, the base frame units, the crus helices-helical rim unit and the superior and inferior crus antihelix unit are fabricated from the costal cartilages. The units for the fabrication of the base frame; these units are fabricated from the sixth and seventh costal cartilages with 38 gauge stainless steel double-armed wire sutures. Diagram 3: The head of the proximal region of the crus helicis is fixed to the posterior surface of the base frame and the notch is aligned to the base flame to reinforce the strength of the 3-D frame. Diagram 4: Wire fixations are placed 3 mm intervals. Note that the loop portion of the wire sutures is embedded into the cartilage framework to avoid the postoperative complication of wire suture protrusion. Diagram 5: The fixation of the superior and inferior crus-antihelix unit, commencing from the superior crus, inferior crus, to the antihelix. Diagram 6: The appearance after the fixation of the tragus unit. Diagram 7: The appearance after the fixation of the conchal vault unit and completely fabricated 3-D frame.
The second stage operation - auricular projection
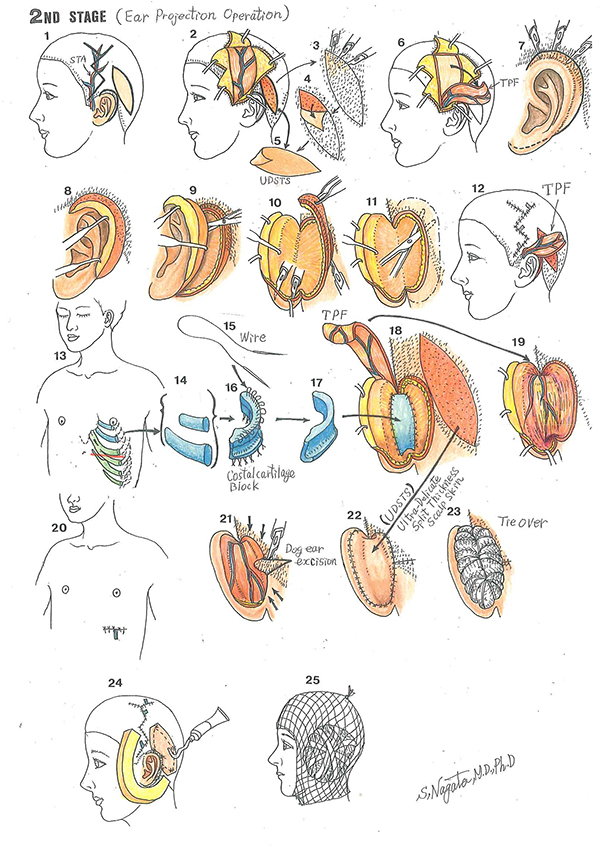
Schematic illustration of the second stage operation - auricular projection. Diagram 1: The outline for the second stage operation, auricular projection. The spindle shape outline is for the harvesting of the ultra-delicate split-thickness scalp skin [UDSTS] and the outline along the helical rim is for the release of the reconstructed auricle. The zigzag outline is the incision outline for the elevation of the temporoparietal fascia flap [TPF] with the superficial temporal artery plotted. Diagram 2 and 5: The harvested UDSTS with the area where it was harvested, and the preparation for the elevation for the TPF. Diagram 3 and 4: The method of harvesting the UDSTS with a scalpel [number 15 blades]. Diagram 6: The elevated TPF. Diagram 7: For the release of the reconstructed auricle, the area immediately adjacent to the helical rim which penetrates into the hair-bearing skin is elevated in the same manner as the UDSTS to the distance of 4 mm from the margin of the reconstructed auricle. Diagram 8: The follicular bud layer is left at the site of elevation of the UDSTS portion of the skin cover. Diagram 9: The release of the reconstructed auricle from the site of the head. Diagram 10: The layer with the follicular buds adjacent to the helical rim is to be excised. Diagram 11: The skin of the temporal and mastoid surfaces is undermined. Diagram 12: The TPF is passed through the skin tunnel and the site of elevation is closed. Diagram 13, 14: C4, C5 costal cartilage harvest. Diagram 15, 16, 17: A simplified illustration of the costal cartilage construct with the modification in the inferior portion of the construct, reversed letter L configuration to increase stability. The cartilage block construct is multi-layered, and the units are fixed with 38-gauge wire sutures. Diagram 18: The cartilage block is fixed to the soft tissue of the posterior surface of 3-D frame and to temporal and mastoid surfaces with 4-0 clear nylon. Diagram 19: The TPF covers the top of exposed helix [the UDSTS portion of the skin cover], the posterior surface of the reconstructed auricle, the cartilage block and the temporal and mastoid surfaces. Diagram 20: Skin suture line. Diagram 21: The skin of the temporal and mastoid surfaces is approximated and the excessive skin is excised in a triangular configuration in the hair-bearing skin to avoid dog ear configuration. Diagram 22: The exposed surface is covered with the UDSTS. Diagram 23: The tie-over is performed to keep the UDSTS in contact to the TPF. Diagram 24: Restone foam sponge is cut out to the reconstructed auricle to provide protection. Diagram 25: The illustrated appearance of the patient after the second stage operation.

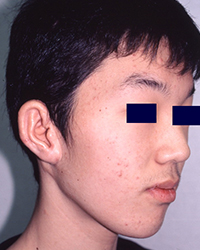
Preoperative appearance
2nd stage post-operative appearance
2nd stage post-operative Appearance
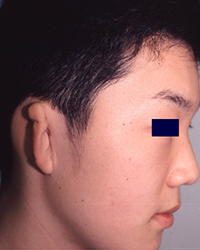
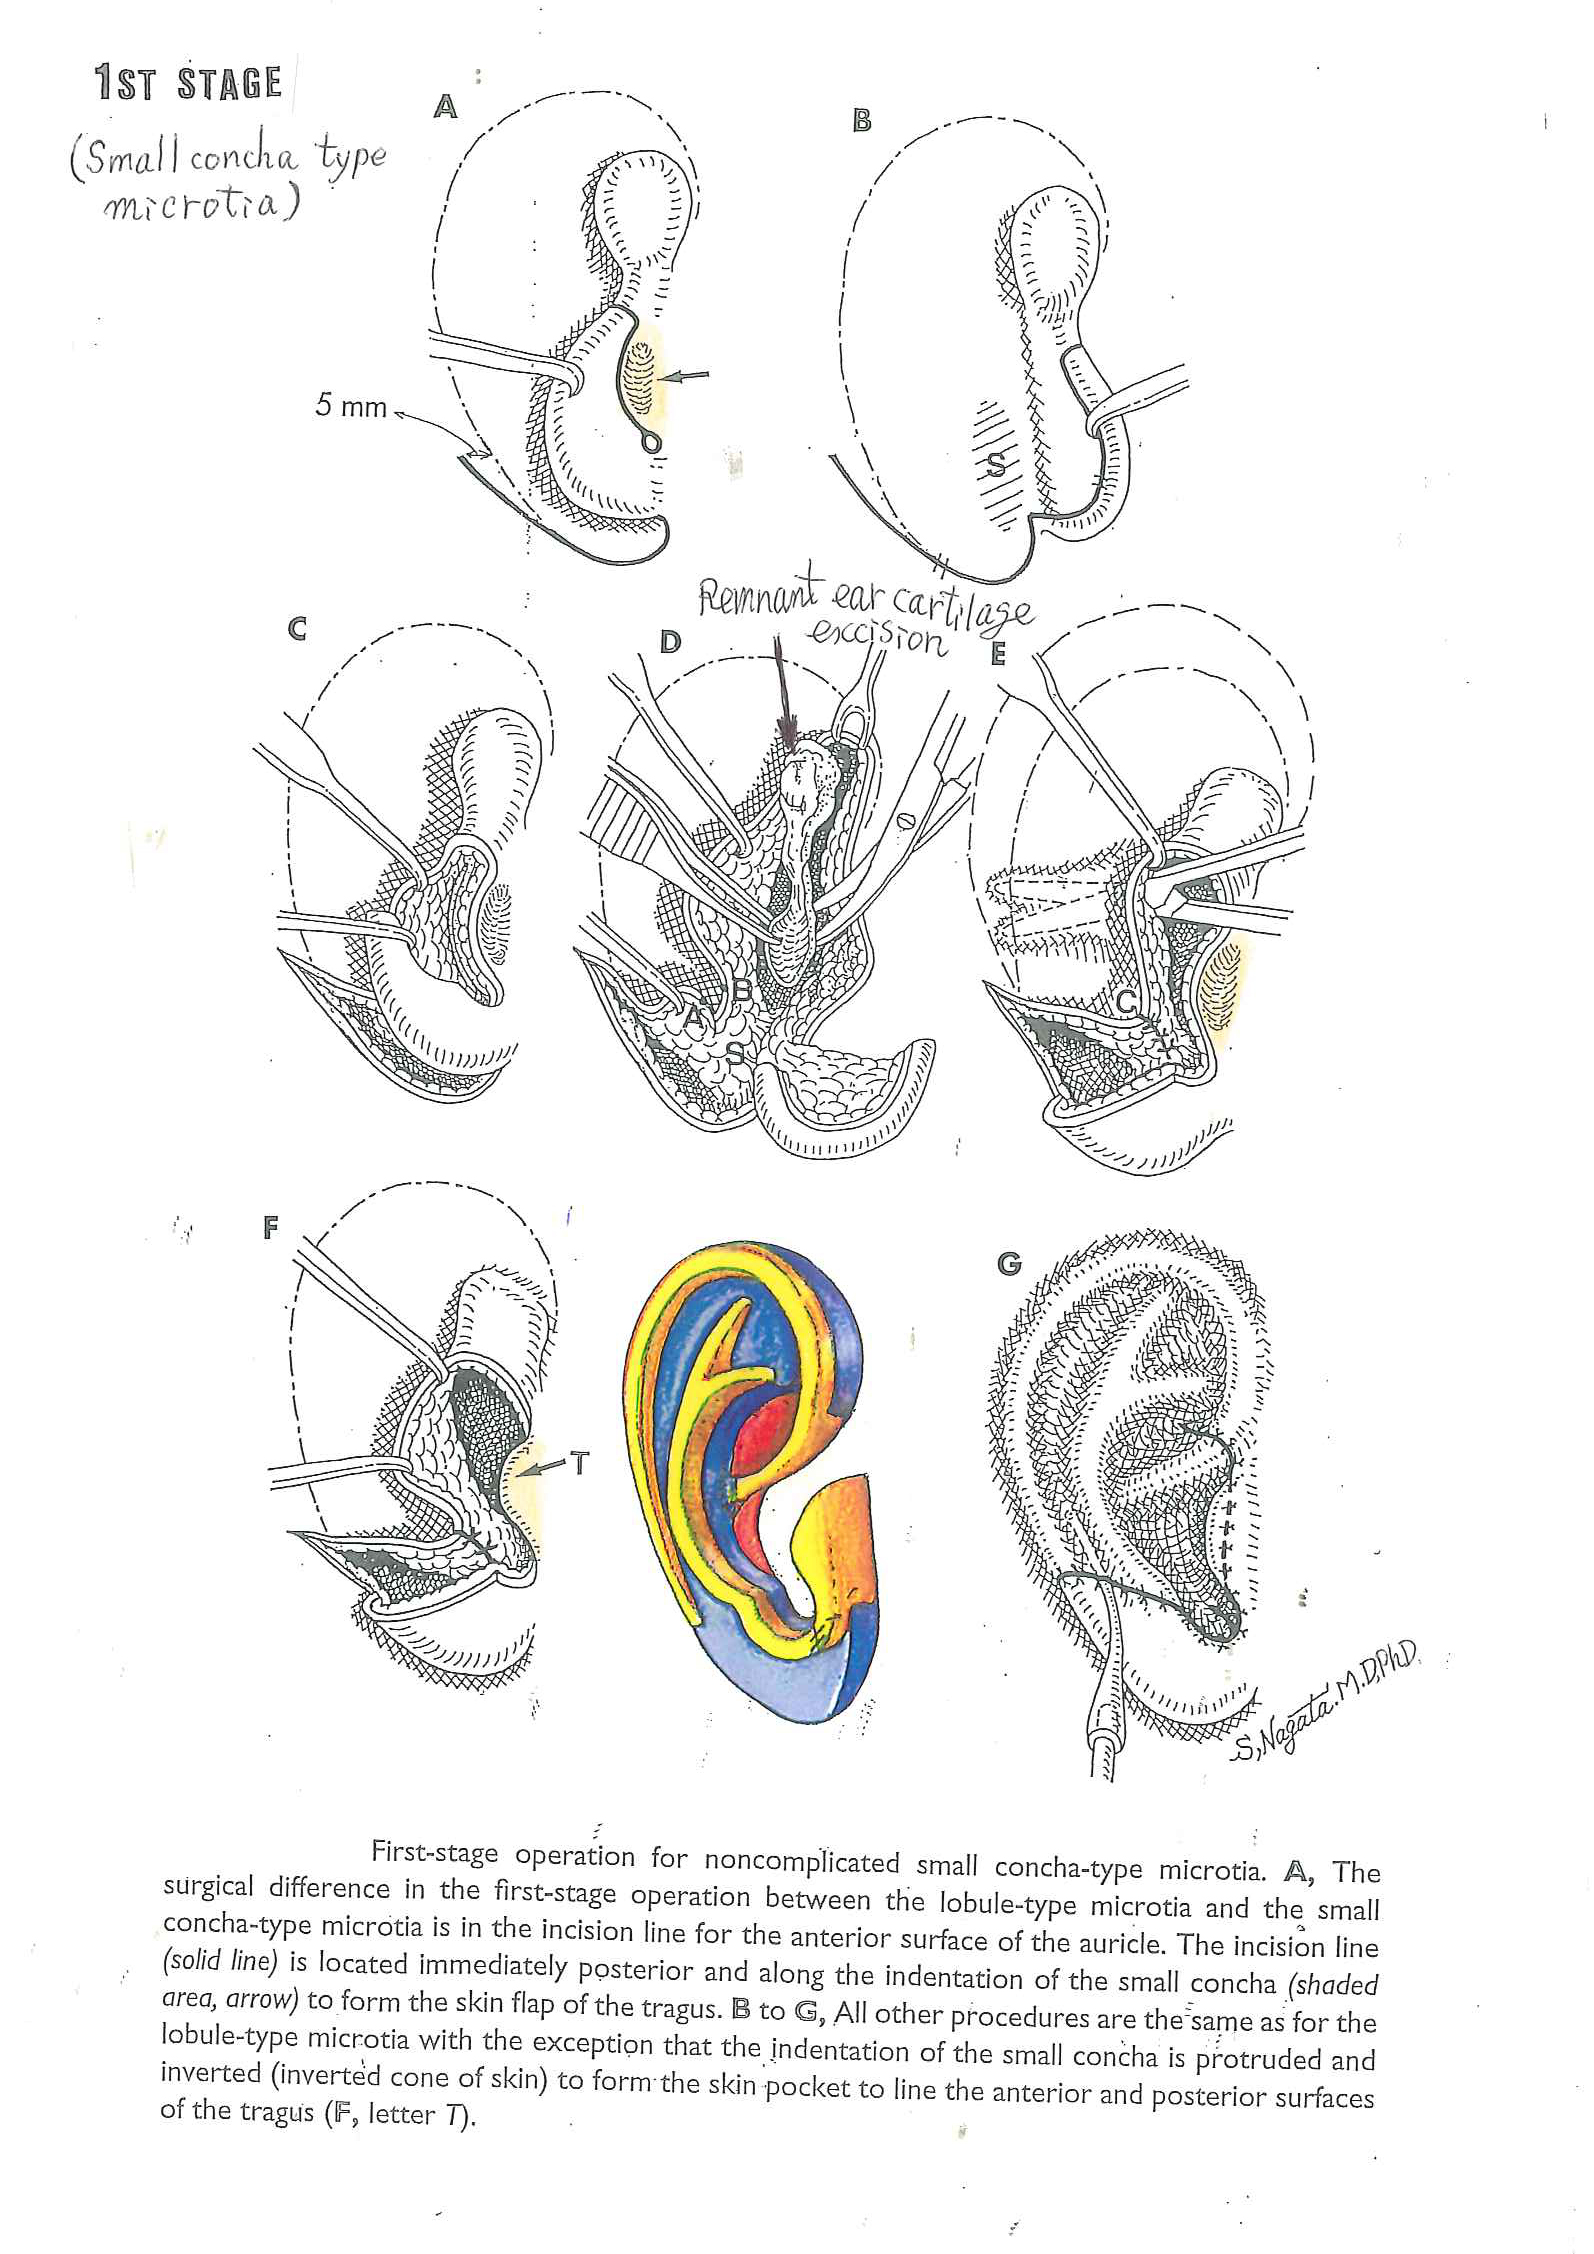
Before the operation:
The preoperative appearance of a typical small concha type microtia.
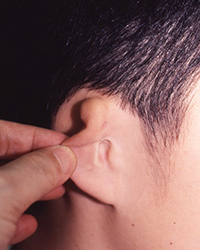
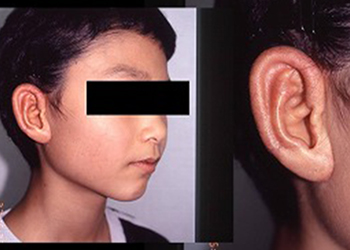
After the second-stage operation:
Appearance after the second stage operation for auricular projection where one can note that all the detailed morphological features have been reconstructed.
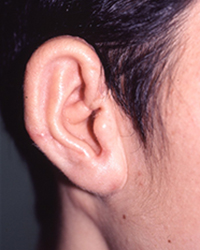
After the second-stage operation:
The left and right auricles of the patient revealing that that the reconstructed auricle has been symmetrically reconstructed.
Photos in this blog are shown for your reference for understanding the treatment of microtia. Please understand that surgery results vary depending on each case.
Possible complications following microtia reconstruction surgery
Transient facial palsy, Failure of skin graft due to vascular compromise, Infection resulting in exposure of the 3-D frame, Pneumothorax, Postoperative pneumonia, Suture failure, Alopecia, Decubitus and Others
In the event such complications arise, appropriate action is taken based on the case. Additional or secondary surgery may be required in some situations.

Click here for “1st-stage operation for small concha type microtia” conducted on Oct. 16, 2014 for your reference.